
Introduction
Let’s assume that we have a situation where I need to export Customer data from Business Central in an Excel Sheet. The simplest way would be to use the Export Functionality in Business Central

But this would require Human interaction with the system. Let’s Automate this using the Excel Buffer Table in Business Central.
Code Section
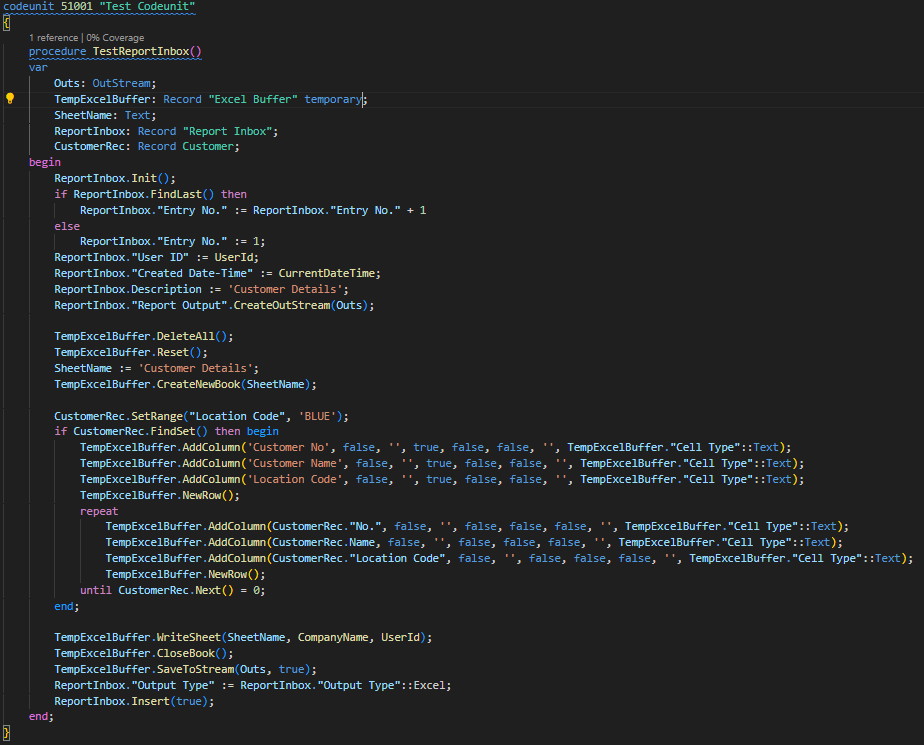
We have created a Test Codeunit and a Procedure to test the Report Inbox Functionality to store the Excel file after its creation to fully automate the experience. Don’t Worry if you don’t understand the concept of Report Inbox, A separate blog will be published soon for that.
ReportInbox.Init();
if ReportInbox.FindLast() then
   ReportInbox."Entry No." := ReportInbox."Entry No." + 1
else
   ReportInbox."Entry No." := 1;
ReportInbox."User ID" := UserId;
ReportInbox."Created Date-Time" := CurrentDateTime;
ReportInbox.Description := 'Customer Details';
ReportInbox."Report Output".CreateOutStream(Outs);
This section of code is used to Create a new Entry in the Report Inbox Table to store the generated Excel Sheet.
TempExcelBuffer.DeleteAll();
TempExcelBuffer.Reset();
SheetName := 'Customer Details';
TempExcelBuffer.CreateNewBook(SheetName);

CustomerRec.SetRange("Location Code", 'BLUE');
if CustomerRec.FindSet() then begin
//Excel Header Row
    TempExcelBuffer.AddColumn('Customer No', false, '', true, false,      false, '', TempExcelBuffer."Cell Type"::Text);
    TempExcelBuffer.AddColumn('Customer Name', false, '', true, false, false, '', TempExcelBuffer."Cell Type"::Text);
    TempExcelBuffer.AddColumn('Location Code', false, '', true, false, false, '', TempExcelBuffer."Cell Type"::Text);
    TempExcelBuffer.NewRow();
    repeat
//Excel Body Rows
        TempExcelBuffer.AddColumn(CustomerRec."No.", false, '', false, false, false, '', TempExcelBuffer."Cell Type"::Text);
        TempExcelBuffer.AddColumn(CustomerRec.Name, false, '', false, false, false, '', TempExcelBuffer."Cell Type"::Text);
        TempExcelBuffer.AddColumn(CustomerRec."Location Code", false, '', false, false, false, '', TempExcelBuffer."Cell Type"::Text);
        TempExcelBuffer.NewRow();
    until CustomerRec.Next() = 0;
end;
This section of code Prepares the Excel sheet and creates the data to be loaded into the sheet. The Customer Table is looped using a Repeat-Until function and the data is loaded using the AddColumn Function.
//The AddColumn Function takes the following parameters
procedure AddColumn(Value: Variant, IsFormula: Boolean, CommentText: Text, IsBold: Boolean, IsItalics: Boolean, IsUnderline: Boolean, NumFormat: Text[30], CellType: Option)
TempExcelBuffer.WriteSheet(SheetName, CompanyName, UserId);
TempExcelBuffer.CloseBook();
TempExcelBuffer.SaveToStream(Outs, true);
ReportInbox."Output Type" := ReportInbox."Output Type"::Excel;
ReportInbox.Insert(true);This section of code inserts the Data in to the Excel sheet and creates an Outstream to stuff the Excel sheet into the Report Inbox Table in a Binary Form.
How to Access Report Inbox?

Since I am lazy, Let’s say I called the procedure in an action and the Excel file has been generated
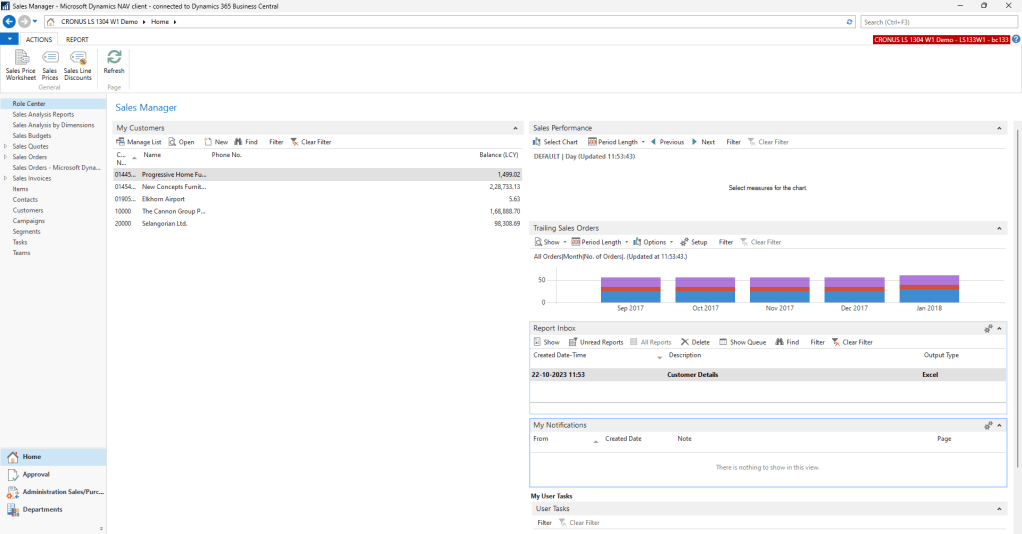
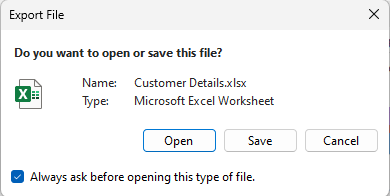
Find the Report Inbox Part page in the Home Page and click the Show Action to save/view the Excel File.

This is the simplest way to use the Excel Buffer Table to create Excel sheets in Business Central. If you would like to read more about the functionality, check out Microsoft’s official https://learn.microsoft.com/en-us/dynamics365/business-central/application/base-application/table/base-application-table-excel-buffer
Hope the Read was worth your time. Thanks for reading.
END

Leave a comment